
Baltic Sea
I know I know it's getting boring but I have so many shots from Rügen. But I promise soon it's over :-)
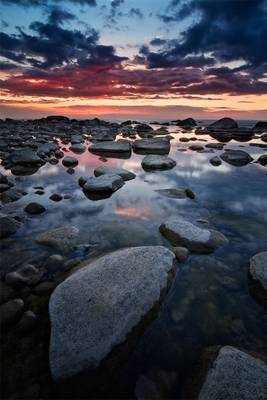
This was from our sunset shoot at kap arkona ... I told the story with the other pic I posted 2 weeks ago.. pure chance and a lot of luck brought us to this rocky shore. It was 15 minutes of chasing comps and wading through the muck .... and not to forget being bitten by moskitos. Here I liked how the stones seem to lead into the picture. You can find your way to the horizon, jumping from stone to stone, but be aware they are a bit slippery sometimes.
Photoshop tip midtone Contouring -> done in the end to add the last bit of needed contrast -> this was inspired by a lesson held by vincent versace at the photoshop convention last year
Most of you might know, that a highpass filter with a high radius (e.g. around 50px) can be used to increase local contrast when you set the layer blending mode to overlay or soft light. Copy the original layer, apply a highpass with 50px radius and switch to overlay or soft light. That's way to harsh so reduce the oppacity to around 30-40 percent. starting to look good... But we will keep the effect to the midtones (hence the name midtone contouring ) so double click on the highpass layer to get to the layer styles. In the blending options you will find two slider bars at the bottom going from black to white with handles to control the blending. We will move the handles of the upper bar, the left one to around 40-60 and the right on to around 190-210. Then ALT+click on each handle and drag the mouse while holding down the button, this will split the handles and let you get a soft blend. So what did you do? You just told the layer to only have effect on the midtones. Apply a mask and selectively apply this layer to help lead the viewers eye through your picture with increased local contrasts in specific parts of the image.
cheers
PS: I'm also on facebook -> www.facebook.com/pages/Michael-Breitung-Photography/36788...
Some of you might have seen my last two shots from Rügen.... Those were from the same day like this one but during dawn. They were the typical planned shots, where you go scouting the day before, pic some nice place for the shoot and come back the next day with enough time for the light to show....
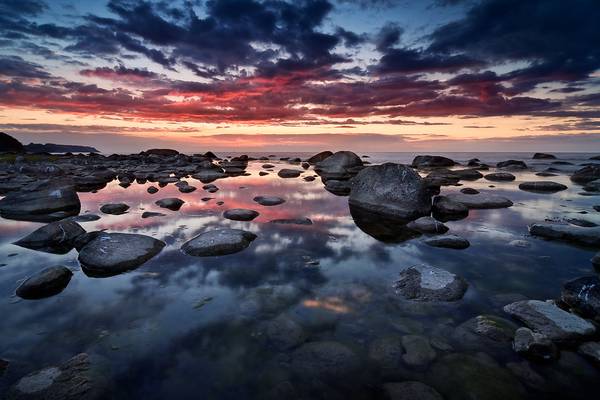
This one is the complete opposite. Not planned at all, nearly missed the light and the place was picked by pure chance... that's also why this is one of my favourites from my Rügen trip. We went to Kap Arkona with still more than one hour till sunset.. I'd thought we'd have enough time to do some scouting and would find some nice subjets to shoot. After all when you look for shots of Kap arkona you always get the same scene with some old ruin standing in the water, which looks quite nice.. So I thought well we'd give it a try.
I thought we'd arrive there drive right to the coast and just walk down the cliff path... but what we didn't know was, it's not allowed for cars to drive to the front where you just needed to walk down.. no during day there are busses running from the parking lot which is more than 2kilometers away.. but in the evening you just have to walk. Not to far you might think but with the magic hour light starting it feels like an eternity. When the sun came down under the clouds and such great rays where showing I got a little disheartened and even wanted to go back to the car and just let this sunset be... but we walked on and finally arrived at the top of the cliffs just to see, that the place I had intended to shoot, the ruin, was in complete shade... hmm damn it. So I gave up and we thought at least we'd explore the place a bit so without rush we walke a bit north. Where we were now standing in the trees there was nearly no light showing at all.. just thousands of mosquitos ;-)
Then coming out of some trees I couldn't believe the sky I was seein with the crimson sun a big disk above the horizon.. now I got excited for just 100 meters farther there was another way down the cliff to the coast so I gave it a run. Well the sun was gone when I was down but the light was even better and now comes the best part, you see it in the photo. That great rock-pool. I saw it, walked through the muck, put up my tripod and snapped the shots.. No thinking at all, I instantly knew how it should look and this is how it came out.
Hope you like it, because me and my tripod had to walk through slippery muck to get it. My hybrid shoos are still smelling a bit...
PS: I'll start with some photoshop tips here .. Every shot one tip. Some might know them but for some it might be something new. So here's a great tip for your workflow
Photoshop-Tip : When you are painting in masks or do other painting or erasing you often don't know which oppacity is the right one. So most of the time you select a low one and do repeated strokes to build up the oppacity. That's no bad way to do it .. But here's my approach ->
When not knowing what oppacity to paint with use 50 percent do your stroke and then hit SHIFT+CTRL+F and you'll get the fade slider. Then you use this slider to get the oppacity you want. A great way to speed up your workflow. I use it all the time when painting in my layer masks to reveal or hide some effects.
cheers
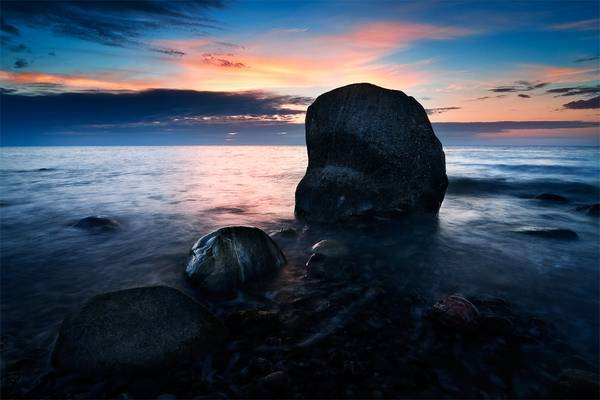
Yet another comp shot at the chalk cliffs in Rügen . I just love this stone in the water and here I had the sweet light directly behind it. I added some blue here to enhance the calm feeling, but not to much. Hope you like it. It's a dri blended in enfuse first and then manually worked on it with the original layers in ps.
So now a photoshop tip concerning colors, nothing spectacular just a little behind the scenes of how I work the colors in my images.... I usually start with selective color adjustment layer and try to remove some color casts in the different colors (a saturation layer above with increased saturation makes this easier).. I usually enhance the red in the yellows and reds by removing cyan and I remove some yellow from the blue and cyan part which deepens the blue, I also add a little cyan here.. this starts to emphasize a warm - cool contrast in the images. Then increase the saturation in a saturation adjustment layer a bit. Now some more selective adjustment focusing solely on a specific color contrast, I usually like orange-blue as I have it here. I like to use colorbalance for this. Add some red and yellow for a warm cast and apply a mask to keep it to specific areas as e.g. the warm clouds in the sky here and the reflection. Another colorbalance where you increase the blue /cyan is good for water, sky and some clouds. This was applied to most of the image here. Usually it takes some more adjsutment layers.. You don't need to get the colors you want with one adjustment layer, just build up the effect by multiple layers and by masking.
cheers
Check out my gallery at www.pixael.com/en/pictures if you want to see more pictures.
You can follow me on https://www.facebook.com/giuseppemilophoto https://twitter.com/pixael_com https://instagram.com/pixael/
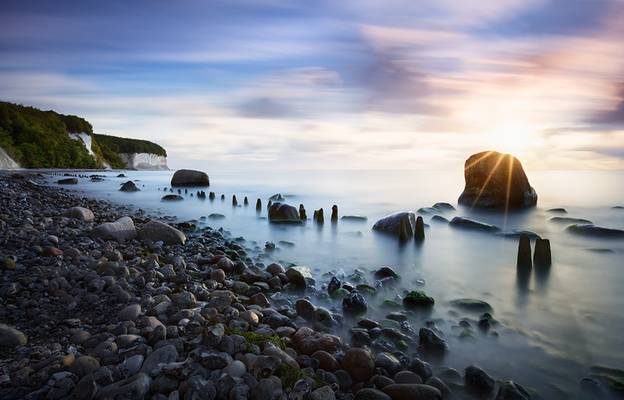
Sunrise at the Chalk Cliffs on the island Rügen. I was using my Big Stopper here to greate a mystic look for this photo. The clouds and the soft light in the foreground are the result of a 103s exposure with the sun peeking through the clouds from time to time. In a second shorter exposure I got the sunstar a bit better and blended both.
Hope you like it.
cheers
2020.09 Ostsee-Berlin-Dresden-390-BA
Thanks to all Phoide contributors to Baltic Sea!
Most notably Michael, Giuseppe Milo and Frank Voigtländer.